Click Here to Download XMLSerializationAndDeserializationApplication.zip
Note : This application contains both serialize and deserialize exmples.
Goto File menu and Download after click on download link.
There is a need where you want objects data into XML format.
You can achieve this using
XML Serialization.
Using XML Serialization you can convert custom objects data into XML and XML into custom objects.
We are using "XmlSerializer" class available in "System.Xml.Serialization" namespace.
There is some prerequisite for custom object class that need to know.
- The classes that are going to serialize must have a default zero-argument constructor. XmlSerializer use this constructor at a time of creating the new object during deserialization process.
- XmlSerializer serializes only public variables and properties.
- All class properties must be readable and writable. Because XmlSerializer uses the property to retrieve information and the property to restore the data after deserialization.
To use XML serialization, you must do mark up data objects with attributes that indicate the desired XML mapping. These attributes are available in the System.Xml.Serialization namespace.
- XmlRoot indicate the name of the root element of the XML file. By default, XmlSerializer will use the name of the class. This attribute apply to the class declaration.
- XmlElement indicates the element name that use for a property or public variable. By default, XmlSerializer will use the name of the property or public variable.
- XmlAttribute indicate that a property or public variable serialized as an attribute.
- XmlIgnore indicate that a property or public variable should not be serialized in serialization process.
- XmlEnum indicate that the text that should be used at the time of serializing enumerated values.
Here is example for this.
In this example we serialize object into XML.
We are taking two classes "ProductCategory" and "Product". We create object of this class fill some data and generate xml using XMLSerialization.
[XmlRoot("productCategory")]
public class ProductCategory
{
[XmlElement("categoryName")]
public string CategoryName;
[XmlElement("categoryDescription")]
public string CategoryDescription;
[XmlElement(ElementName = "launchDate", DataType = "date")]
public DateTime LaunchDate;
[XmlArray("products")]
[XmlArrayItem("product")]
public Product[] Products;
public ProductCategory()
{
}
public ProductCategory(string categoryName, string categoryDescription, DateTime launchDate)
{
this.CategoryName = categoryName;
this.CategoryDescription = categoryDescription;
this.LaunchDate = launchDate;
}
}
public class Product
{
[XmlElement("productName")]
public string ProductName;
[XmlElement("productWeight")]
public decimal ProductWeight;
[XmlElement("productPrice")]
public decimal ProductPrice;
[XmlAttributeAttribute(AttributeName = "id")]
public int Id;
public Product()
{
// Default constructor for serialization.
}
public Product(int productId, string productName, decimal productWeight , decimal productPrice)
{
this.Id = productId;
this.ProductName = productName;
this.ProductWeight = productWeight;
this.ProductPrice = productPrice;
}
}
protected void Page_Load(object sender, EventArgs e)
{
// Create the product catalog.
ProductCategory objCategory = new ProductCategory("Category 1", "Category for sports", DateTime.Now);
Product[] lstProducts = new Product[3];
lstProducts[0] = new Product(1,"Bat", 2, 20.39m);
lstProducts[1] = new Product(2,"Ball", 1, 2.90m);
lstProducts[2] = new Product(3,"Stumps", 3, 50.70m);
objCategory.Products = lstProducts;
XmlSerializer objXMLSerializer = new XmlSerializer(typeof(ProductCategory));
FileStream objFS = new FileStream( Server.MapPath( "ProductDetails.xml"), FileMode.Create);
objXMLSerializer.Serialize(objFS, objCategory);
objFS.Close();
}
VB.net Examples :
<XmlRoot("productCategory")> _
Public Class ProductCategory
<XmlElement("categoryName")> _
Public CategoryName As String
<XmlElement("categoryDescription")> _
Public CategoryDescription As String
<XmlElement(ElementName:="launchDate", DataType:="date")> _
Public LaunchDate As DateTime
<XmlArray("products")> _
<XmlArrayItem("product")> _
Public Products() As Product
Public Sub New()
End Sub
Public Sub New(ByVal categoryName As String, ByVal categoryDescription As String, ByVal launchDate As DateTime)
Me.CategoryName = categoryName
Me.CategoryDescription = categoryDescription
Me.LaunchDate = launchDate
End Sub
End Class
Public Class Product
<XmlElement("productName")> _
Public ProductName As String
<XmlElement("productWeight")> _
Public ProductWeight As Decimal
<XmlElement("productPrice")> _
Public ProductPrice As Decimal
<XmlAttributeAttribute(AttributeName:="id")> _
Public Id As Integer
Public Sub New()
End Sub
Public Sub New(ByVal productId As Integer, ByVal productName As String, ByVal productWeight As Decimal, ByVal productPrice As Decimal)
Me.Id = productId
Me.ProductName = productName
Me.ProductWeight = productWeight
Me.ProductPrice = productPrice
End Sub
End Class
Protected Sub Page_Load(ByVal sender As Object, ByVal e As System.EventArgs) Handles Me.Load
Dim objCategory As ProductCategory = New ProductCategory("Category 1", "Category for sports", DateTime.Now)
Dim lstProducts() As Product = New Product(2) {}
lstProducts(0) = New Product(1, "Bat", 2, 20.39)
lstProducts(1) = New Product(2, "Ball", 1, 2.9)
lstProducts(2) = New Product(3, "Stumps", 3, 50.7)
objCategory.Products = lstProducts
Dim objXMLSerializer As XmlSerializer = New XmlSerializer(Type.GetType(objCategory.ToString()))
Dim objFS As FileStream = New FileStream(Server.MapPath("ProductDetails.xml"), FileMode.Create)
objXMLSerializer.Serialize(objFS, objCategory)
objFS.Close()
End Sub
Output XML File ("ProductDetails.xml") :
<?xml version="1.0"?>
<productCategory xmlns:xsi="http://www.w3.org/2001/XMLSchema-instance" xmlns:xsd="http://www.w3.org/2001/XMLSchema">
  <categoryName>Category 1</categoryName>
  <categoryDescription>Category for sports</categoryDescription>
  <launchDate>2012-08-29</launchDate>
  <products>
    <product id="1">
      <productName>Bat</productName>
      <productWeight>2</productWeight>
      <productPrice>20.39</productPrice>
    </product>
    <product id="2">
      <productName>Ball</productName>
      <productWeight>1</productWeight>
      <productPrice>2.90</productPrice>
    </product>
    <product id="3">
      <productName>Stumps</productName>
      <productWeight>3</productWeight>
      <productPrice>50.70</productPrice>
    </product>
  </products>
</productCategory>
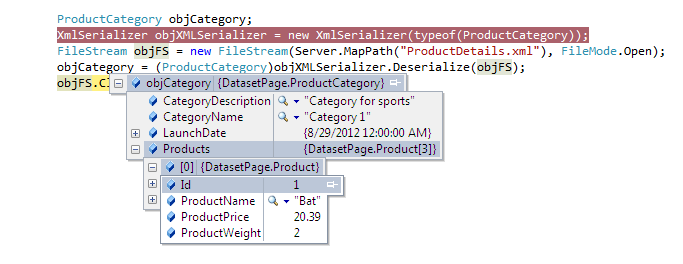
Click Here to View
"XML Deserialization with C# Examples and VB.Net Examples".
Click Here...
This is very useful .Net Tips.
For Beginning .Net articles. Click Here...
Note : Give
Us your valuable feedback in comments. Give your suggestions in this
article so we can update our articles accordingly that.


 .
.